WVGG tutorials
Building an interactive map with NextJS, Google Maps and Sanity
I’ve been asked to install “store locator” widgets a few times over the years. I was surprised to learn that it’s even a product that people pay for! In this house we build our own shit.
This tutorial assumes you have basic experience in NextJS, Sanity, and Typescript; and that Sanity is set up for automatic type generation. (If you aren’t using typegen, you can replace the Sanity.whatever types with unknown or manually written types… my dude you are missing out). And if you’re not using NextJS, these instructions should be very easy to adapt.
This tutorial is deliberately a bit rough. You can see a polished, production-complete example here.
You can download a working copy of this tutorial here.
Setup
We all live in dependency hell!
npm install google-map-react usehooks-ts
In your .env file, add your you will need an API key:
NEXT_PUBLIC_GOOGLE_MAPS_KEY=some-string-from-google
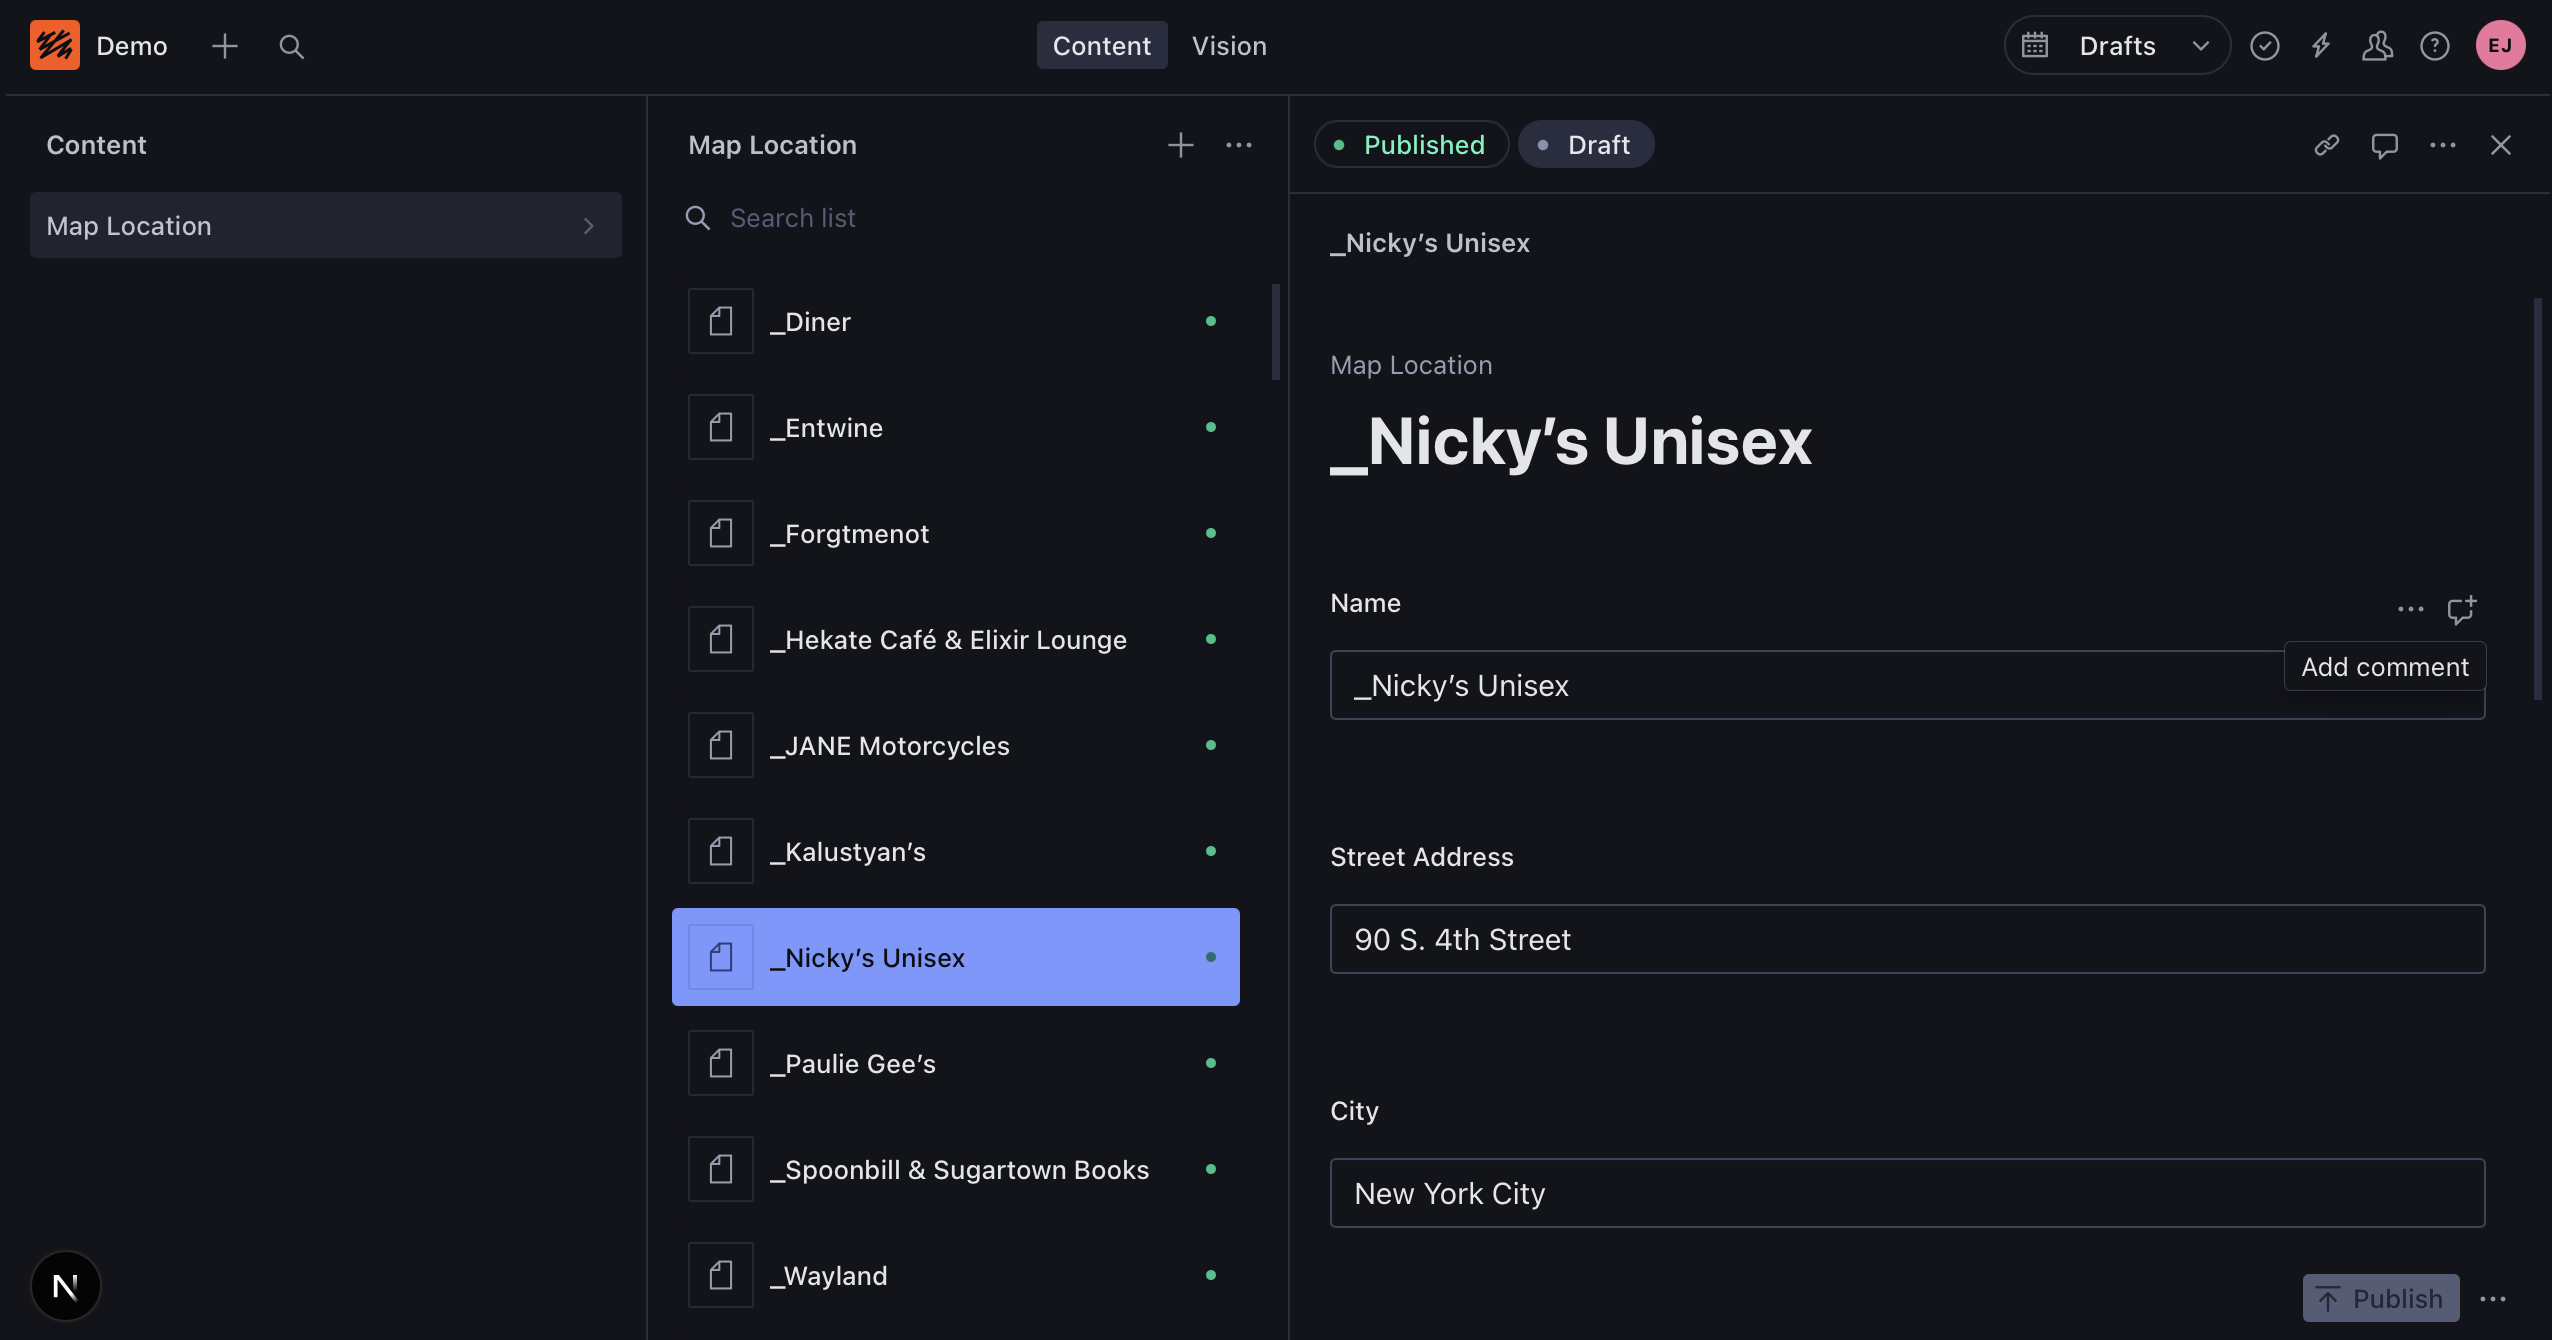
Add a map location schema to Sanity
You’ll need to create a basic schema in Sanity to store the map locations.
import { defineField, defineType } from "sanity"

export const mapLocationSchema = defineType({
  name: "mapLocation",
  type: "document",
  orderings: [
    {
      title: "Location Name",
      name: "locationName",
      by: [{ field: "name", direction: "asc" }],
    },
  ],
  fields: [
    defineField({
      name: "name",
      type: "string",
      validation: (Rule) => Rule.required().max(60),
    }),
    defineField({
      name: "streetAddress",
      type: "string",
    }),
    defineField({
      name: "city",
      type: "string",
      validation: (rule) => rule.required(),
    }),
    defineField({
      name: "state",
      type: "string",
      validation: (rule) => rule.required().min(2).max(2),
    }),
    defineField({
      name: "postalCode",
      type: "string",
      validation: (rule) => rule.min(5).max(5),
    }),
    defineField({
      name: "latitude",
      type: "number",
      validation: (rule) => rule.required().min(-90).max(90),
      fieldset: "coordinates",
    }),
    defineField({
      name: "longitude",
      type: "number",
      validation: (rule) => rule.required().min(-180).max(180),
      fieldset: "coordinates",
    }),
  ],
  // a “coordinates” group to keep things tidy
  fieldsets: [
    {
      title: "Coordinates",
      name: "coordinates",
      options: {
        columns: 2,
      },
    },
  ],
})
Yes, -90 to 90 and -180 to 180 are the valid ranges for latitude and longitude figures!
Add this to your existing Sanity schema:
import { mapLocationSchema } from "./mapLocationSchema"

export const schema: { types: SchemaTypeDefinition[] } = {
  types: [
    // … your existing schema,
    mapLocationSchema,
  ],
}
And create a Groq query for retrieval: mapLocationsQuery.ts
import { defineQuery } from "next-sanity"

export const mapLocationsQuery = defineQuery(`
  *[_type == 'mapLocation']
`)
If you don’t have lat/lng coordinates for your data, I’m going to follow up this tutorial with two approaches for retrieving coordinates.
Optional: seed with demo data.
If you’d like to start out with some seed data, save this file as seed.ndjson to your project folder, and run on the terminal:
npx sanity dataset import seed.ndjson production
NextJS Page
I’m assuming you’re using the App Router here, and use some kind of alias imports. If you’re a monster who doesn’t use alias imports, replace @/ below with hard-coded paths to your Sanity client, the query, and the Map.tsx file you’ll be making in just a moment.
Create /app/locations/page.tsx:
import { sanityFetch, mapLocationsQuery } from "@/sanity"
import { Map } from "@/ui"

export default async function MapLocationsPage() {
  const { data } = await sanityFetch({
    query: mapLocationsQuery,
  })
  if (!data) throw new Error("error loading map locations from Sanity")
  return <Map locations={data} />
}
We’re going to do the rest of this in three steps…
If all you want is a map with pins, steps 2 and 3 are totally optional!
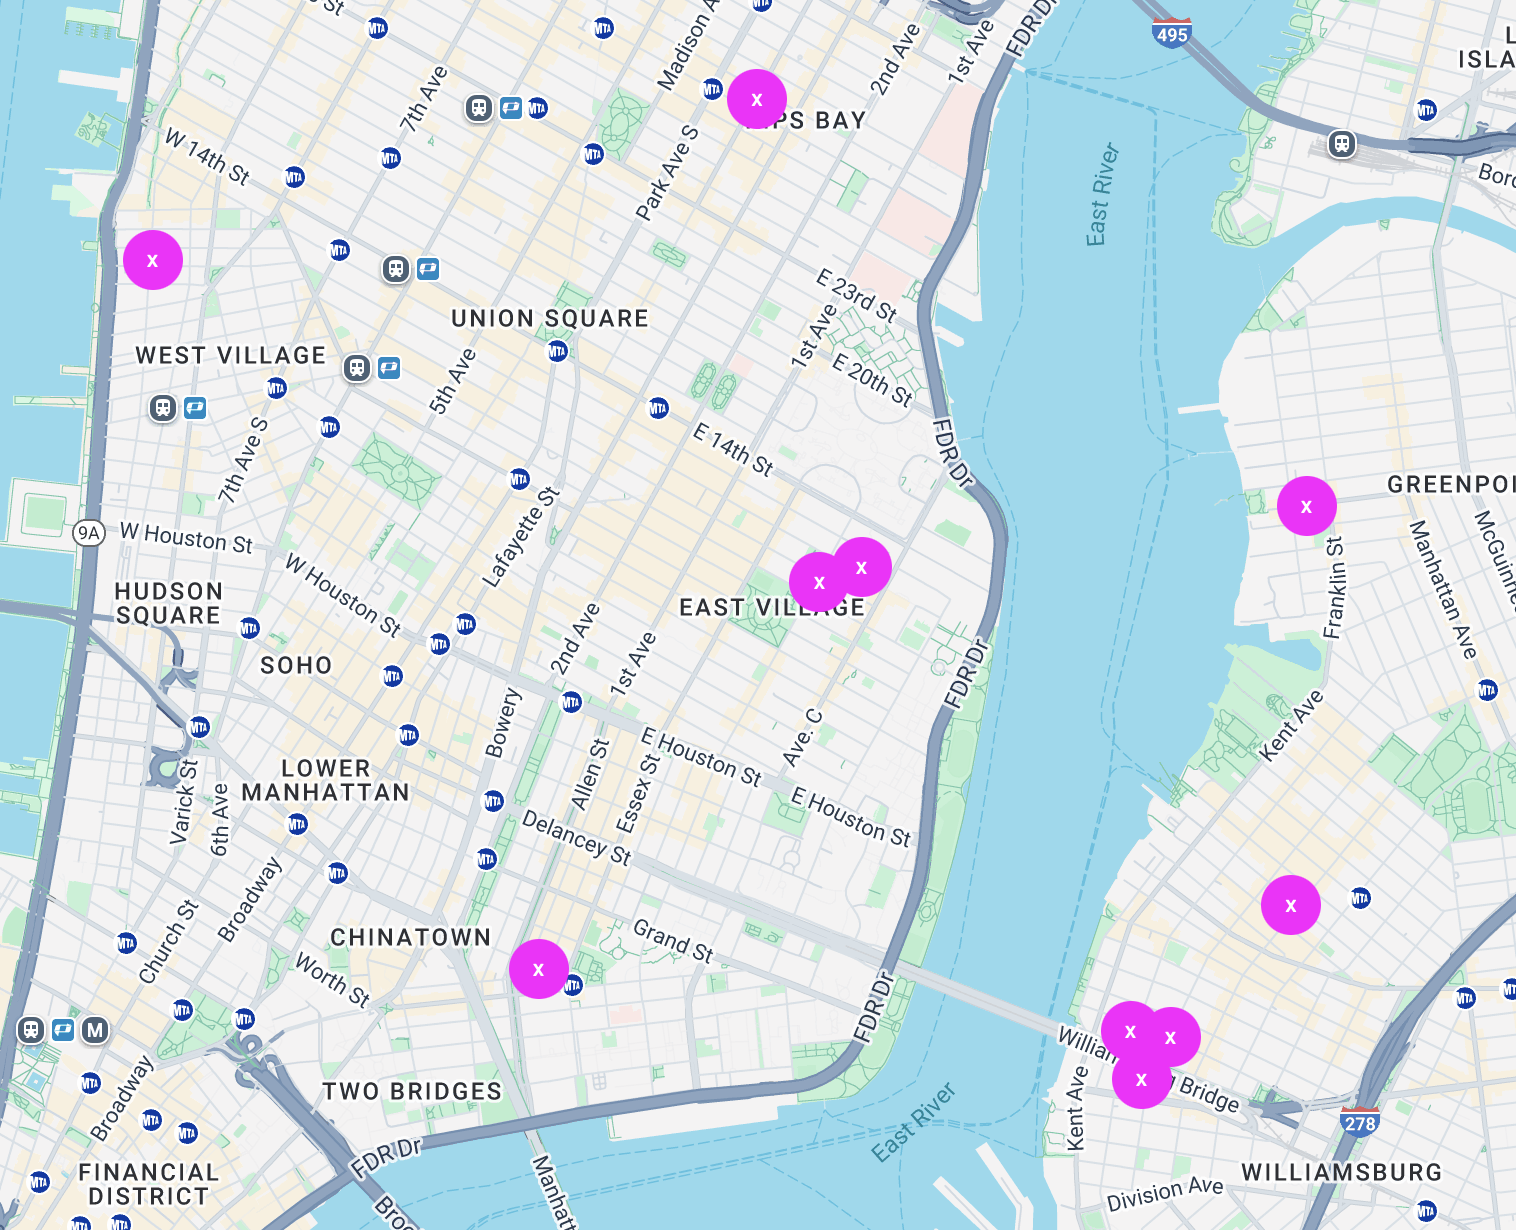
Basic map with pins
Pin component
We’ll need a component for our Pin. Create the following file Pin.tsx:
"use client"

interface PinProps {
  lat: number
  lng: number
  onClickAction?: () => void
}
export const Pin = ({ onClickAction, ...rest }: PinProps) => (
  <div
    style={{
      position: "relative",
      display: "flex",
      justifyContent: "center",
      alignItems: "center",
      width: "20px",
      height: "20px",
      background: "magenta",
      color: "black",
      cursor: "pointer",
      fontSize: "40px",
      borderRadius: "50% 50% 50% 0",
      border: "3px solid #000",
      transformOrigin: "bottom left",
      transform: "rotate(-45deg) translateX(100%)",
    }}
    onClick={onClickAction}
    {...rest}
  >
    <div
      style={{
        position: "absolute",
        content: "",
        width: "7px",
        height: "7px",
        borderRadius: "50%",
        top: "50%",
        left: "50%",
        marginLeft: "-3.5px",
        marginTop: "-3.5px",
        backgroundColor: "#000",
      }}
    />
  </div>
)
I like to use garish colors for placeholder styles; feel free to add your own custom styles, or use Tailwind if you’re some kind of animal.
Map component
Create a new component called Map.tsx:
'use client'

// imports
import { GoogleMapReact } from 'google-map-react'
import { useState, useMemo, useRef } from 'react'
import { useWindowSize } from 'usehooks-ts'
import { Pin } from './Pin'

// constants
const MAP_DEFAULT_LAT = 41.8277584
const MAP_DEFAULT_LNG = -87.6620778
const MAP_DEFAULT_ZOOM = 10
const MAP_CLUSTER_RADIUS = 120
const MAP_MAX_ZOOM = 20
const GOOGLE_MAPS_KEY = process.env.NEXT_PUBLIC_GOOGLE_MAPS_KEY

// component
const UnhydratedMap = ({ locations }: { locations: Sanity.MapLocationsQueryResult }) => {
  // states

  // data

  // hooks
  const { width } = useWindowSize()

  // actions

  return (
    <main
      style={{
        // see NOTE 1
        height: width < 744 ? "80dvh" : "63dvw",
        width: "100%"
      }}
    >
      <GoogleMapReact
        // map options
        bootstrapURLKeys={{ key: googleMapsKey }}
        defaultZoom={defaultZoom}
        options={{
          // see NOTE 2
          clickableIcons: false,
        }}
        defaultCenter={{
          lat: MAP_DEFAULT_LAT,
          lng: MAP_DEFAULT_LNG
        }}
      >
        {locations
          .filter(location => !!location.latitude && !!location.longitude)
          .map((location) => (
            <Pin
              key={location._id}
              lat={location.latitude}
              lng={location.longitude}
              // onClick
            />
        ))}

        {/* map children */}
      </GoogleMapReact>

      {/* see NOTE 3 */}
      <style type="text/css">
        {`.gm-style div > img {position: absolute;}`}
      </style>
    </main>
  )
}

// types

export const Map = dynamic(() => Promise.resolve(UnhydratedMap), { ssr: false })
Important fixes for unexpected behaviors
NOTE 1: Google maps requires that the width and height of the map are explicitly set in the style attribute. It doesn’t have to be in pixels — I’m using dvw and dvh units — but it has to be in a style= attribute. Putting it in className= will not work!
NOTE 2: Google makes certain locations like public parks clickable by default. That can lead to unexpected results if you have a map pin near one of these locations. clickableIcons: false fixes that.
NOTE 3: Embedded maps may have a missing row of map tiles on the bottom row. It’s been a known bug for years. That style declaration fixes it.
What’s next/dynamic?
Google Maps introduces a lot of dependencies into your project. By using next/dynamic, this stuff is kept outside your normal site javascript payload, and is only loaded on demand.
Technically it’s not necessary; you may need to remove that if you’re using a completely static NextJS build.
That’s it
You should have a working map with pins now. If that’s all you want, clean up the // insert comments, pat yourself on the back, and go hit happy hour.
Popups
Still here? Okay, let’s make a popup that shows a name and address when the user clicks on a pin.
ArrayElement<> type
First, a little Typescript. When dealing with typegen, it’s not uncommon to get a type like…
interface LocationQueryResult = Array<{
  name: string
  streetAddress: city
  latitude: number // etc.
}>
But this sucks when you want to use a single member of the array.
const [location, setLocation] = useState<unknown>()
setItem(locationQueryResult[0])
You know what it is, it’s a single instance of the SomeQueryResult array… If you’re new to Sanity generated types, you might think that Sanity.MapLocation or Partial<Sanity.MapLocation> would do the trick, but that doesn’t include _key, and as soon as you get creative with Groq, nested relationships, or even just images, that approach falls apart fast.
ArrayElement<> to the rescue! ArrayElement<T> is a custom Typescript utility, similar to Pick<T> and Omit<T>, and wildly useful — the maintainers of Typescript really ought to build it or something similar into the language.
Add this to your index.d.ts (if you already have a global declaration, just insert the second line there):
declare global {
  declare type ArrayElement<ArrayType extends readonly unknown[]> = ArrayType extends readonly (infer ElementType)[] ? ElementType : never;
}
Now this will work:
const [item, setItem] = useState<ArrayElement<SomeQueryResult>>()
setItem(someQueryResult[0])
Bonus: is the array in question a property of a type?
interface SomeQueryResult = {
  locations: Array<{
    name: string
    streetAddress: city // etc.
  }>
}

const [item, setItem] = useState<ArrayElement<SomeQueryResult['locations']>>()
The above example is a pretty good example of Sanity typegen output: because a Groq can do basically anything, it’ll never automatically type items as Array<MapLocation>. It’s best to think of query results as resembling schema types.
Once you start using ArrayElement<>, you’ll wonder how you ever got by without it.
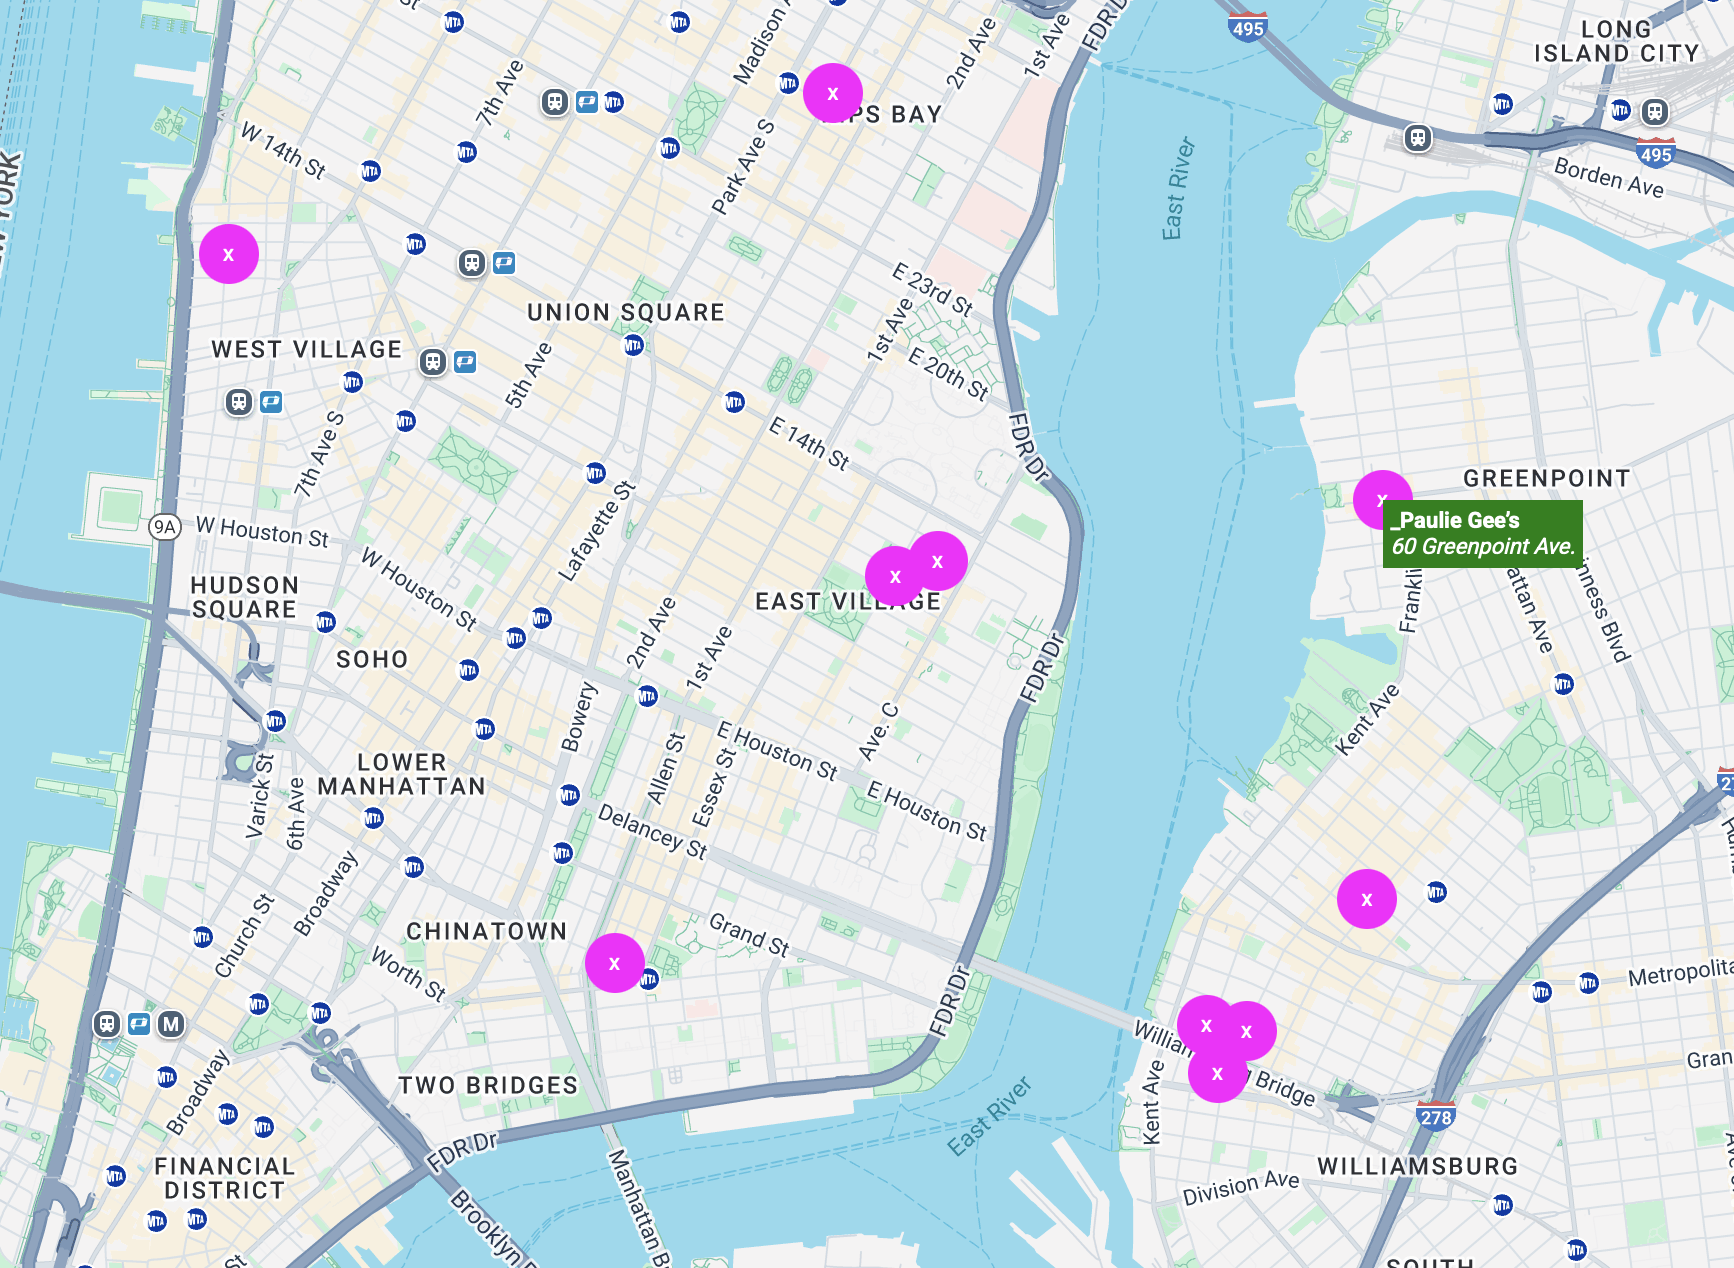
Popup Component
When I first built one of these, my impulse was to put a popup inside each pin with it’s own show/hide state. That approach doesn’t scale well; it’s not uncommon to have hundreds of pins (more on that when we get to clusters). Instead, we’re going to make one <Popup /> component, with a dynamic position.
Create Popup.tsx:
"use client"

interface PopupProps {
  lat?: number
  lng?: number
  location?: ArrayElement<Sanity.MapLocationsQueryResult>
}
export const Popup = ({ location, ...rest }: PopupProps) => (
  <div
    style={{
      position: "absolute",
      display: !!location ? "block" : "none",
      padding: "4px",
      background: "green",
      color: "white",
    }}
    {...rest}
  >
    <div>
      <strong>{location?.name}</strong>
    </div>
    <div>
      <em>{location?.streetAddress}</em>
    </div>
  </div>
)
Add the Popup and functionality to the Map component.
Insert after // imports:
import { Popup } from "./Popup"
Insert this after // states (here’s our friend ArrayElement<> again!):
const [activeLocation, setActiveLocation] = useState<ArrayElement<Sanity.MapLocationsQueryResult> | null>(null)
Insert after {/* map children */}:
<Popup location={activeLocation || undefined} lat={activeLocation?.latitude} lng={activeLocation?.longitude} />
Replace // onClick with:
onClickAction={() => setActiveLocation(location)}
Recap: we’re now tracking an “active location”. Upon clicking a map pin, that location is set. The popup activeLocation to derive its copy, and hides itself if no lat/lng is selected.
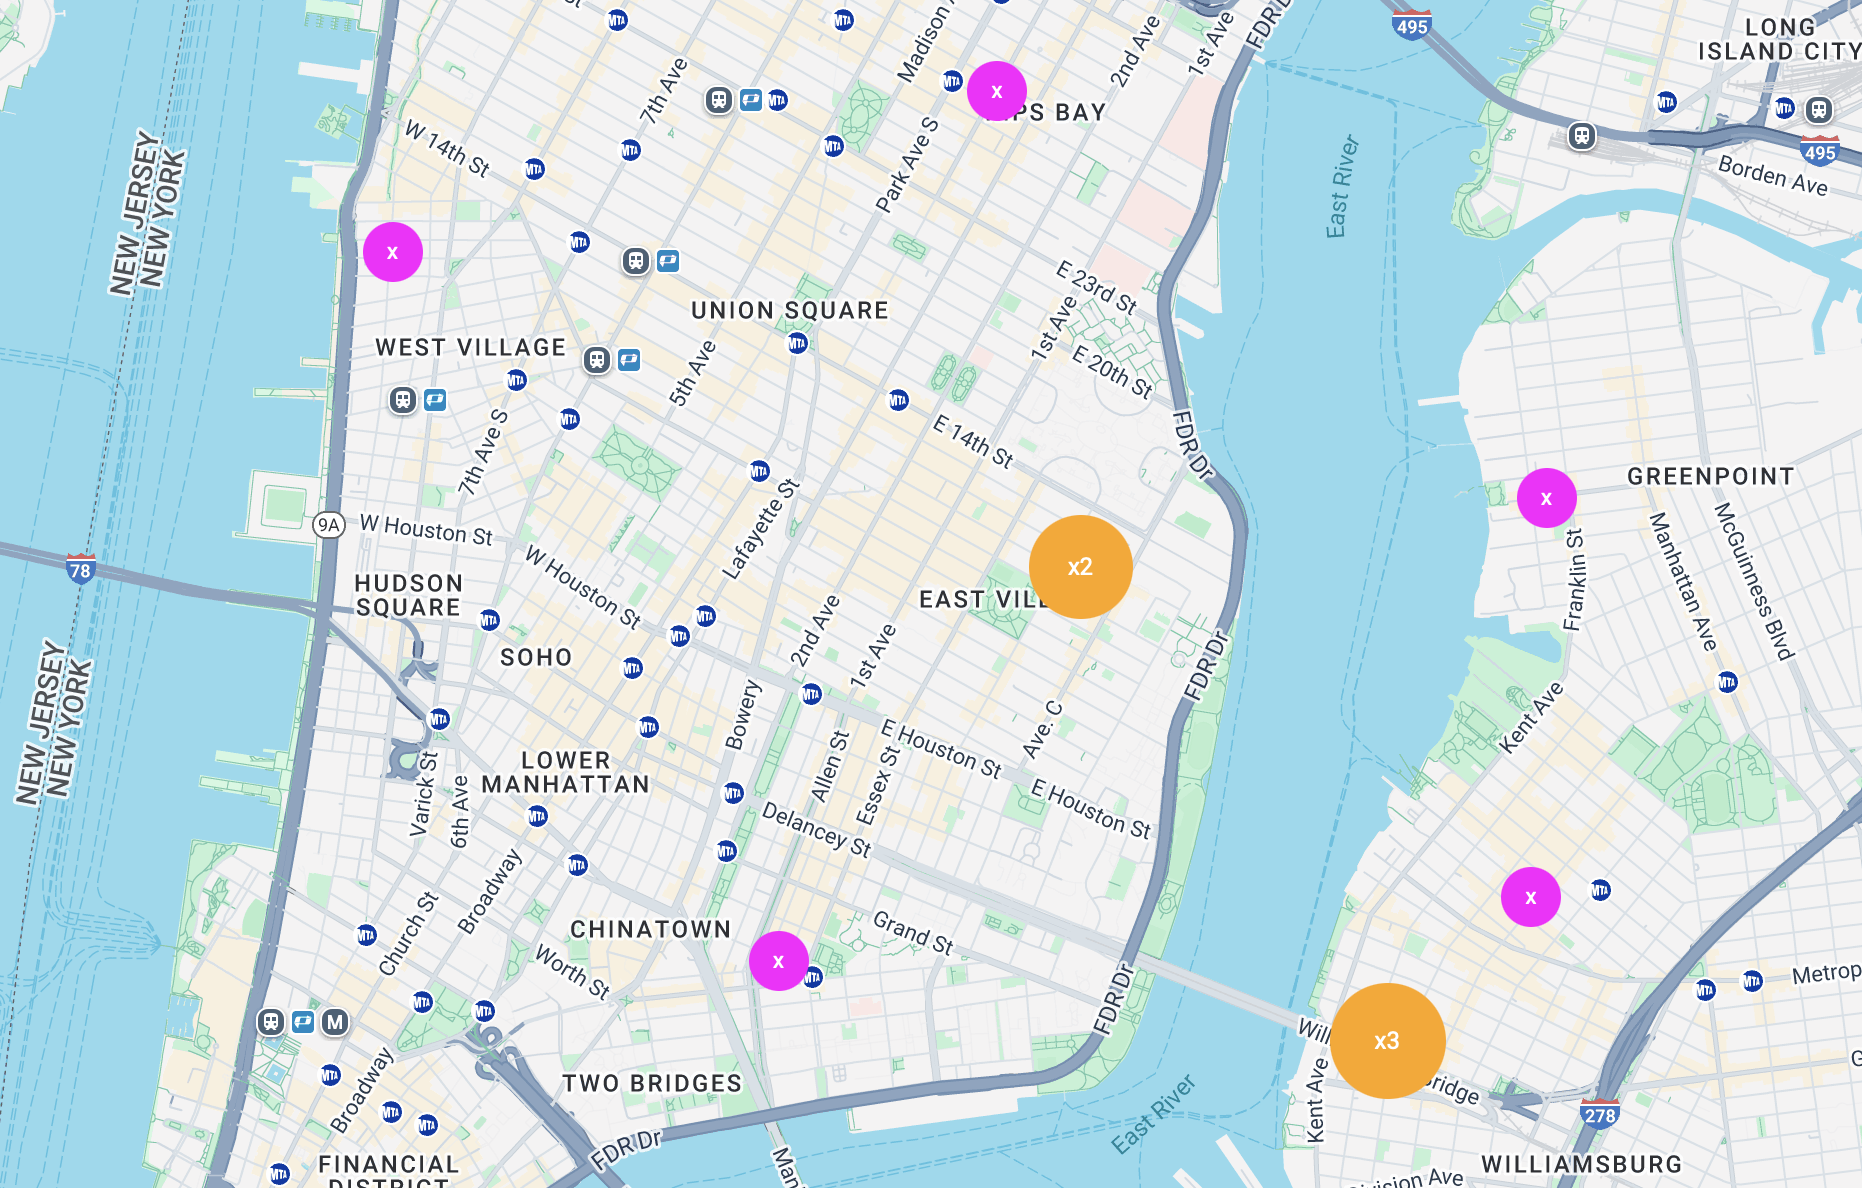
Clusters
When multiple pins are close to each other on a map, they become indiscernible and unclickable. If you’re dealing with even a handful of pins, this can become necessary fast.
SuperCluster is this insane package that can take a pile of points, and output a mixed array of clusters of closely-located points and isolated points. It’s compatible with other map solutions like Mapbox and is generally just amazing.
Cluster component
We’ll need a <Cluster /> component to represent clusters on the map. It’s very similar to the <Pin /> component. Create Cluster.tsx:
"use client"

interface ClusterProps {
  lat: number
  lng: number
  pointCount: number
  totalPoints: number
  onClickAction: () => void
}

const MIN_CLUSTER_SIZE = 40
const MAX_CLUSTER_SIZE = 100

export const Cluster = ({ pointCount, totalPoints, onClickAction, ...rest }: ClusterProps) => {
  const diameter = MIN_CLUSTER_SIZE + (pointCount / totalPoints) * (MAX_CLUSTER_SIZE - MIN_CLUSTER_SIZE)
  return (
    <div
      onClick={onClickAction}
      style={{
        width: diameter.toString() + "px",
        height: diameter.toString() + "px",
        position: "relative",
        display: "flex",
        justifyContent: "center",
        alignItems: "center",
        transform: "translateX(-50%) translateY(-50%)",
        borderRadius: "100%",
        border: "3px solid black",
        background: "orange",
        color: "black",
        fontSize: "14px",
        letterSpacing: "1px",
        fontWeight: "bold",
      }}
      {...rest}
    >
      x{pointCount}
    </div>
  )
}
The diameter variable lets you size up the cluster to represent larger counts. Feel free to just use a static size if that’s not desired.
Add clusters to <Map /> component
There’s a lot of steps here, so I’ve done my best to make them very granular. First, add these dependencies to the project:
npm install supercluster use-supercluster
Add to // imports:
import useSupercluster from "use-supercluster"
import { type PointFeature } from "supercluster"
import { Cluster } from "./Cluster"
Insert after // states:
const [bounds, setBounds] = useState<[number, number, number, number]>([0, 0, 0, 0])
const [zoom, setZoom] = useState(MAP_DEFAULT_ZOOM)
const mapRef = useRef<any>(null)
Instead of simply mapping over the locations, we need to map over structured points that can be read by SuperCluster. To avoid rebuilding this array on every component render, we’ll use useMemo() to emsmarten things.
Insert after // data:
const points = useMemo(() =>
  locations
    .filter(location => !!location.latitude && !!location.longitude)
    .map(
      (location) =>
        ({
          type: "Feature",
          properties: { cluster: false, locationData: location },
          geometry: {
            type: "Point",
            coordinates: [location.longitude, location.latitude],
          },
        } as PointFeature<MarkerProperties>)
    ),
  [locations]
)
Insert after // types:
interface MarkerProperties {
  cluster: boolean
  cluster_id?: number
  point_count?: number
  point_count_abbreviated?: number
  locationData: Member<Sanity.MapLocationsQueryResult>
}
Now we’ll set up a hook that turns our map points into a mix of clusters and pins. Insert after // hooks:
const { clusters, supercluster } = useSupercluster({
  points,
  bounds,
  zoom,
  options: {
    radius: CLUSTER_RADIUS,
    maxZoom: MAX_ZOOM
  },
})
We’ll need a click action for the cluster markers. Insert after // actions:
const zoomOnCluster = (clusterId: number | string, lat: number, lng: number) => {
  if (typeof supercluster === "undefined") return
  const newZoom = Math.min(
    MAP_MAX_ZOOM,
    supercluster.getClusterExpansionZoom(typeof clusterId === "number"
      ? clusterId
      : Number(clusterId))
  )
  mapRef.current?.setZoom(newZoom)
  mapRef.current?.panTo({ lat, lng })
}
We need to give the Map the ability to update the zoom and bounds from our code. Insert after // map options:
yesIWantToUseGoogleMapApiInternals
onGoogleApiLoaded={({ map }) => {
  mapRef.current = map
}}
onChange={({ zoom, bounds }) => {
  setZoom(zoom)
  setBounds([bounds.nw.lng, bounds.se.lat, bounds.se.lng, bounds.nw.lat])
}}
Finally, we need to replace the location pins with a mix of clusters and pins. Delete this…
{locations.map(({_id, latitude, longitude}) => (
  // etc.
))}
… and replace it with:
{clusters.map((mapItem) => {
  const [longitude, latitude] = mapItem.geometry.coordinates
  const { cluster: isCluster, point_count: pointCount, locationData } = mapItem.properties
  return isCluster && pointCount ? (
    <Cluster
      key={`cluster-${mapItem.id}`}
      lat={latitude}
      lng={longitude}
      pointCount={pointCount}
      totalPoints={points.length}
      onClickAction={() => zoomOnCluster(mapItem.id!, latitude, longitude)}
    />
  ) : (
    <Pin
      key={locationData._id}
      lat={latitude}
      lng={longitude}
      onClickAction={() => setActiveLocation(locationData)}
    />
  )
})}
I hope that’s pretty straightforward: useSuperCluster generates the new mix of Cluster and Pin items; we map over them and output the correct components. Clicking on a cluster will automatically zoom in and distinguish the pins.
Hey cool we’re done :P
Follow-up tutorial
I’m going to follow this up with two more tutorials, both regarding different approaches to getting the latitude and longitude coordinates for locations from Google Maps.
- Coming soon: building a custom Sanity GetCoordinates input component!
- Coming soon: syncing a Google Spreadsheet into Sanity, with automatic Google Maps geolocation lookups.